Public News 01.09.2024
 Hello again!
It’s time for another Dev Post about the current state of development of Mind the School!
Now just one week ago, I released Version 0.1.4 for Early Access! Don’t worry, it will release for Student-Tier on 4th and for public on 7th.
Now I wanna say, I’m rather happy with the update. I got in a lot of stuff I wanted to add or to change and even got the new sandbox event type in at last minute.
So what happened since the release! Well I wasn’t just lazing around in the last week. I worked on some fixes for 0.1.4 and then I worked on the modding framework.
Modding
Now I planned to make the game easily modable from the beginning. Just like AAR or HHS+, this game is a type that has to be allowed to be modable.
So for that reason I worked hard from the beginning to make the code as modular, dynamic and easily extendable as possible.
So how would it get modded? Well that is a topic for later, but I will write a (hopefully) good documentation on the wiki page.
I’ll become a bit more technical for the rest of this post. If you’re not into it you can just skip ahead to the end :)
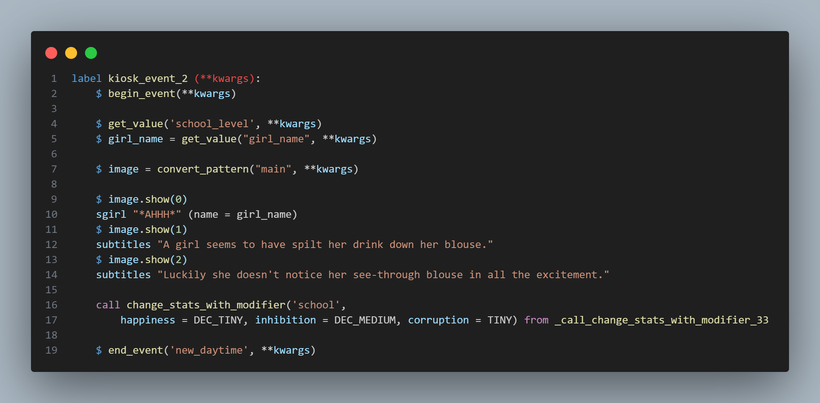
But just to give a small preview, I’ll show a the code for one of the small events in the game. This one has been added with 0.1.2:
 So on the first glimpse, there are some things that are not really clear, like where does the Pattern in row 7 come from or what does row 4 do? But it’s all rather simple.
Each event starts with the begin_event function. That prepares everything that is needed for the event. It prepares the Replay Gallery Module to start tracking values and decisions and in case of a replay, it instead provides the values selected in the Replay Menu.
Row 4 and 5 are an example of how to get those values needed for the event. The get_value function get the values from the ‘kwargs’ variable and provides it for the event to use, like the girl name in row 5 which is then used in row 10.
In row 4 the function is called but does not provide the value. That is because the get_value function not only retrieves the value, it also registers the value in the replay gallery, so it can then be used there. That step is important, as that value would otherwise be missing in the replay. But why have it in there in the first place. Well we can’t see the school level be used here, but the convert_pattern function in row 7 uses it, but since it is already stored in kwargs, we don’t need to provide it again. We’ll see more about the pattern later. All we need to know is, convert_pattern creates an image object which can be used to display the images in an orderly fashion.
Row 9 to 14 are just normal dialogue or text in a rather Ren’Py fashion (except for the image)
Row 16 and 17 manipulate the stats. I just provide for who I want to change the stats. In this case the school and then I just list all the stats that are to be changed, together by how much. Instead of numbers I use Values like TINY or SMALL or similar, because another method converts them to a random value in a certain range. TINY for example can be any value between 0.1 and 0.3 .
And finally we have the end_event method which is always at the end of each event. Its job is to wrap up everything, like closing the Gallery Manager, returning to the Replay Menu when the event has been played as a replay or just jumping to the next Event Fragment when the Event is a composite.
But how do we even register the Event itself?
Like this:
 Oh, that looks rather convoluted. But the principle is rather simple. You create an Event, you give it a priority, you say where the event is (The label name from the previous image) and then you give it all it’s needed values and set up conditions, when the event is available. And then maybe a thumbnail image for the replay gallery.
So let’s get through it step by step.
In row 1 we call the add_event function of an EventStorage object. Nothing special. An EventStorage takes all the Events for a certain set, in this case for all “Get Snacks”-Events and then provides them later where we can just say, call an event. It then goes through all events, looking for all available ones and then picks them based on the priority. Well I say priority, but it is a bit different than a classic priority. We have 1, 2 and 3. Priority 3 means, take all available Prio 3 Events you can find and pick a random one from those. 2 means, pick all available Prio 2 events and play all of them one after another. And 1 means, pick the first available Prio 1 event you can find and play that one.
So we can see in row 2, this Event is Priority 3, so it will be chosen at random, together will the other events.
In row 3 and 4 we have so-called Selector-classes (Well I call them that.). These provide the values for the events. We can find “school_level” and “girl_name” here. LevelSelector provides the current level. In this case of the school. And RandomListSelector picks a random element from the one listed. The first Element in all Selectors is always the key used to retrieve the values in the event. There are dozens of different Selector types enabling Value-Selection based on conditions, calculations and more.
In row 5 we have Condition-classes (The OR is a Condition-class as well). These classes limit, when the event is available to be picked. Here we have 2 Time conditions. The first one limits the event to only be available on weekdays during free time and the second one only to the weekend at any time except the night. Since both of them are in the OR-block, only one of those conditions has to be fulfilled for the event to be available.
In row 6 we then have the Pattern class. This one was freshly introduced for the modding system. Before that, the image pattern was provided in the event itself from the previous image. By having the pattern sit here, modders are able to overwrite the image path to another one where they provide their own images. Here we also finally see where the school_level value is used. It will be interpolated into the image path with the convert_pattern method we saw in the previous image. And since we can provide a series of images used for an event, we just name the image the same throughout and just replace the “step” value, so we can call that image with image.show(0) for example.
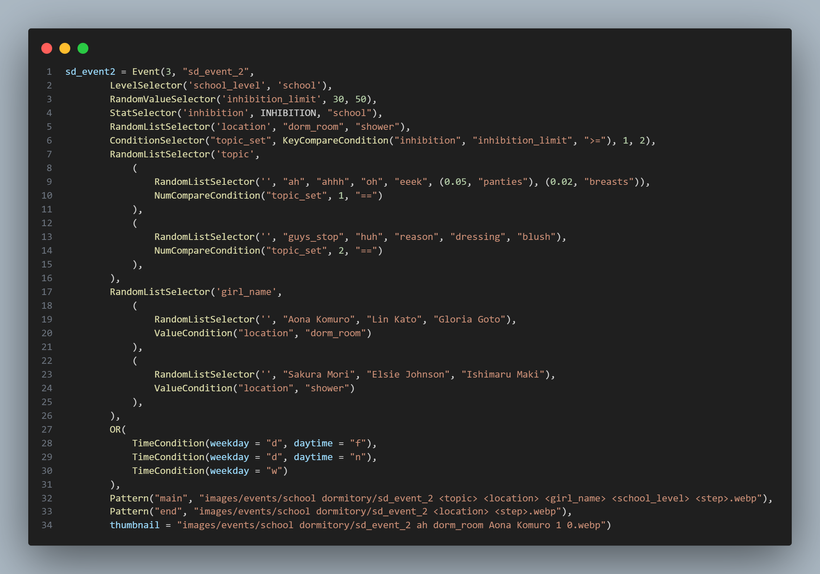
Now depending on the event you are writing, these definitions can get really complicated:
 This for example is for an event in the dormitory. Maybe try to figure out what is happening here.
I won’t go through it with you since the post is already rather long.
But for the last part, I know for a lot of that stuff I used or created, there are inbuilt solutions, but those were just too limiting for me. The Selector or Condition classes allow me to use them when, where and how I want. It is also easily possible for modders to add their own Selectors or Conditions in. No problem! So I opted for this. They are also widely usable. They are used for the selection of the background images at the different locations or for the definition of the different rules and such. I really kinda created my own framework here in Ren’Py.
That’s all for the technical talk :)
Resumé
So the early access update release went rather well currently. One major bug because of an compatibility issue with old save games. But that is now fixed. Otherwise no other bug messages from other people.
I worked all week since the release on the new modding system, and I could say it is almost finished :D
I’ll now enjoy my Sunday with some off time and I hope you do as well!
In the next public post I’ll talk about the upcoming plans for 0.1.5 .
See you then! Bye!
Get Mind the School
Mind the School
Corrupt your School to create a heaven of Free Love.
| Status | In development |
| Author | Suit-Ji |
| Genre | Simulation, Interactive Fiction |
| Tags | 3D, Adult, Animation, Erotic, Indie, Management, Ren'Py, Sandbox, Singleplayer |
| Languages | English |
| Accessibility | Subtitles |
More posts
- Public News 01.06.202519 days ago
- Public News 01.05.202550 days ago
- Public News 01.04.202580 days ago
- Public News 01.03.2025Mar 01, 2025
- Christmas Event Mod (finally)Feb 07, 2025
- Public News 01.02.2025Feb 01, 2025
- Release 0.2.0CJan 01, 2025
- Happy Holidays! 🎄🎁Dec 25, 2024
- Public News 01.12.2024Dec 01, 2024
- Public News 01.11.2024Nov 01, 2024

Leave a comment
Log in with itch.io to leave a comment.